Account Registration - Personal Information
Overview
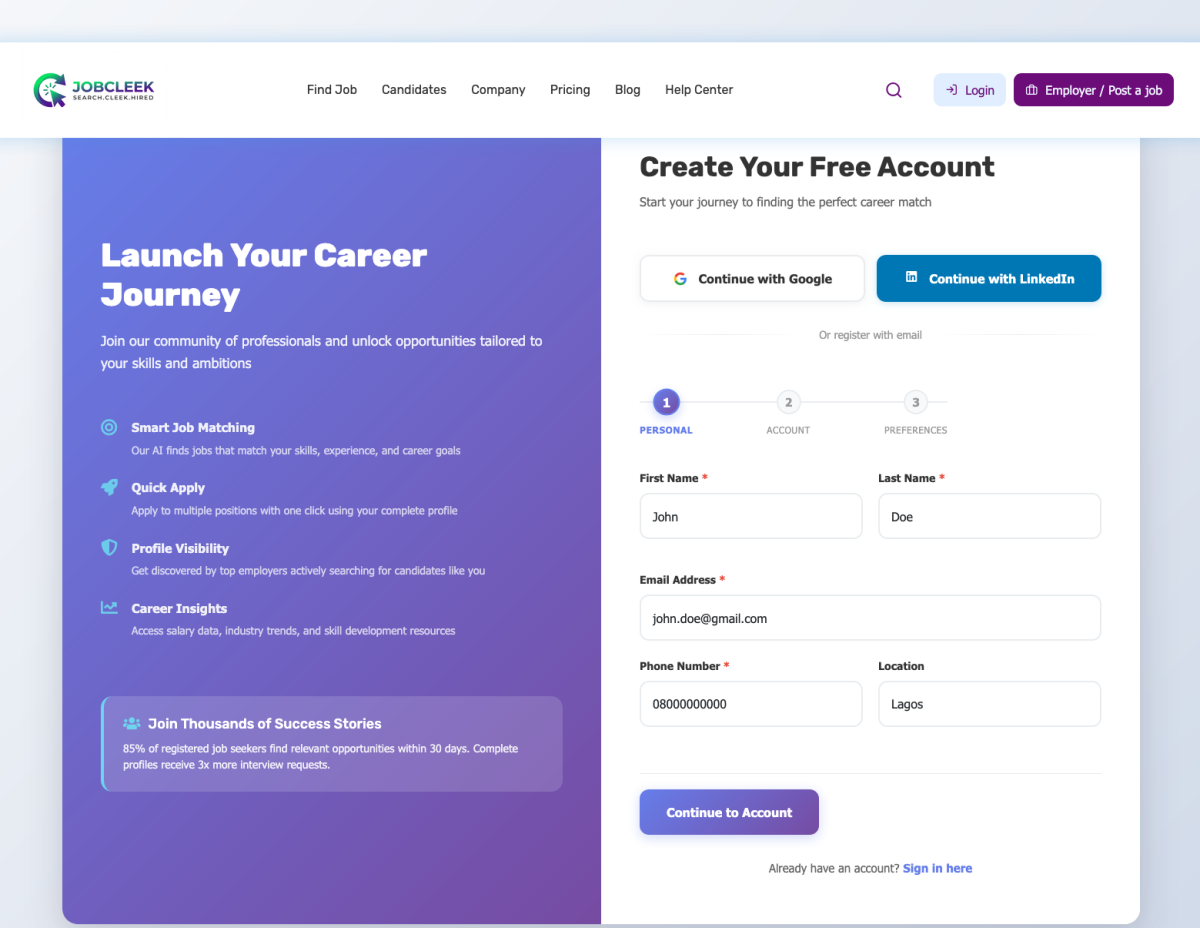
This is the first step of the account creation process for the JobCleek platform. The page collects basic personal information from new users who want to create a free account to access job opportunities and career resources.
Target Users: Job seekers, professionals, and candidates looking to join the JobCleek platform
Purpose: To capture essential user details including name, email, phone number, and location to create a personalized account
When to Use: This is the entry point for all new users registering on the platform
Navigation Path
Homepage → Sign Up / Register → Account Registration (Step 1 of 3)
Or via:
- Top navigation bar → "Employer / Post a Job" → Register option
- Login page → "Sign up here" link
Page Layout Breakdown
Left Panel (Purple Background)
- Hero Section: "Launch Your Career Journey" headline with supporting text
- Feature List: Four key platform benefits with icons:
- Smart Job Matching
- Quick Apply
- Profile Visibility
- Career Insights
- Social Proof Banner: "Join Thousands of Success Stories" with statistics
Right Panel (White Background)
- Page Header: "Create Your Free Account" with subtitle
- Social Login Options: Google and LinkedIn buttons
- Step Indicator: Visual progress tracker (Step 1 of 3: Personal, Account, Preferences)
- Registration Form: Four input fields for personal information
- Primary Action Button: "Continue to Account"
- Login Link: For existing users at the bottom
Step-by-Step User Guide
To Create a New Account:
- Choose a registration method:
- Click "Continue with Google" for quick signup using your Google account, OR
- Click "Continue with LinkedIn" to import your LinkedIn profile, OR
- Continue with email registration (steps below)
- Enter your first name in the "First Name" field (e.g., "John")
- Enter your last name in the "Last Name" field (e.g., "Doe")
- Enter your email address in the "Email Address" field (e.g., "john.doe@gmail.com")
- Enter your phone number in the "Phone Number" field (e.g., "0800000000")
- Select your location from the "Location" dropdown menu (e.g., "Lagos")
- Click "Continue to Account" to proceed to step 2
- Already have an account? Click "Sign in here" at the bottom to go to the login page
Fields, Buttons & Controls Explanation
|
Element |
Type |
Purpose |
Required |
Notes |
|---|---|---|---|---|
|
Continue with Google |
Button |
Quick registration using Google OAuth |
Optional |
Alternative to manual registration |
|
Continue with LinkedIn |
Button |
Quick registration using LinkedIn OAuth |
Optional |
May auto-populate profile data |
|
First Name |
Text Input |
User's given name |
Required |
Marked with red asterisk (*) |
|
Last Name |
Text Input |
User's family name |
Required |
Marked with red asterisk (*) |
|
Email Address |
Email Input |
User's email for account access |
Required |
Must be valid email format; marked with asterisk (*) |
|
Phone Number |
Tel Input |
Contact number |
Required |
Marked with red asterisk (*) |
|
Location |
Dropdown |
User's city or region |
Required |
Pre-populated options available |
|
Continue to Account |
Primary Button |
Submits form and advances to step 2 |
N/A |
Only active when all required fields are completed |
|
Sign in here |
Text Link |
Redirects to login page |
N/A |
For existing users |
Tips & Best Practices
✅ Use social login (Google/LinkedIn) for faster registration and to auto-populate your profile information
✅ Use a professional email address that you check regularly for job notifications
✅ Ensure your phone number is accurate for potential employer contact
✅ Select your primary job search location to receive relevant local opportunities
✅ Keep your information consistent with your resume and LinkedIn profile
Common Mistakes
❌ Using a temporary or invalid email address – You won't receive verification emails or job alerts
❌ Entering incorrect phone number format – May prevent employers from contacting you
❌ Skipping required fields – The "Continue to Account" button won't activate
❌ Using a personal nickname instead of legal name – May cause issues with professional verification
Troubleshooting
|
Issue |
Solution |
|---|---|
|
"Continue to Account" button is disabled |
Ensure all required fields (marked with *) are filled in correctly |
|
Email already exists error |
Click "Sign in here" to log in with existing credentials |
|
Social login not working |
Check browser permissions for pop-ups; try manual email registration instead |
|
Location not in dropdown |
Select the nearest major city or contact support |
|
Not receiving verification email |
Check spam folder; verify email address is correct |
Related Pages / Next Steps
Next: Account Registration - Account Setup (Step 2 of 3)
- Create password
- Set job preferences
- Choose experience level
Related:
- Login Page (for existing users)
- Help Center → Account Creation Guide
- Privacy Policy & Terms of Service
Page 2: Account Registration - Account Setup
Overview
This is the second step of the account creation process where users set up their account security and initial job preferences. This page collects password credentials and basic career information to personalize the user's job search experience.
Target Users: New users continuing from Step 1 of registration
Purpose: To establish secure account credentials and capture initial job search preferences (job title and experience level)
When to Use: Automatically accessed after completing Step 1 (Personal Information)
Navigation Path
Homepage → Register → Personal Information (Step 1) → Account Setup (Step 2 of 3)
Page Layout Breakdown
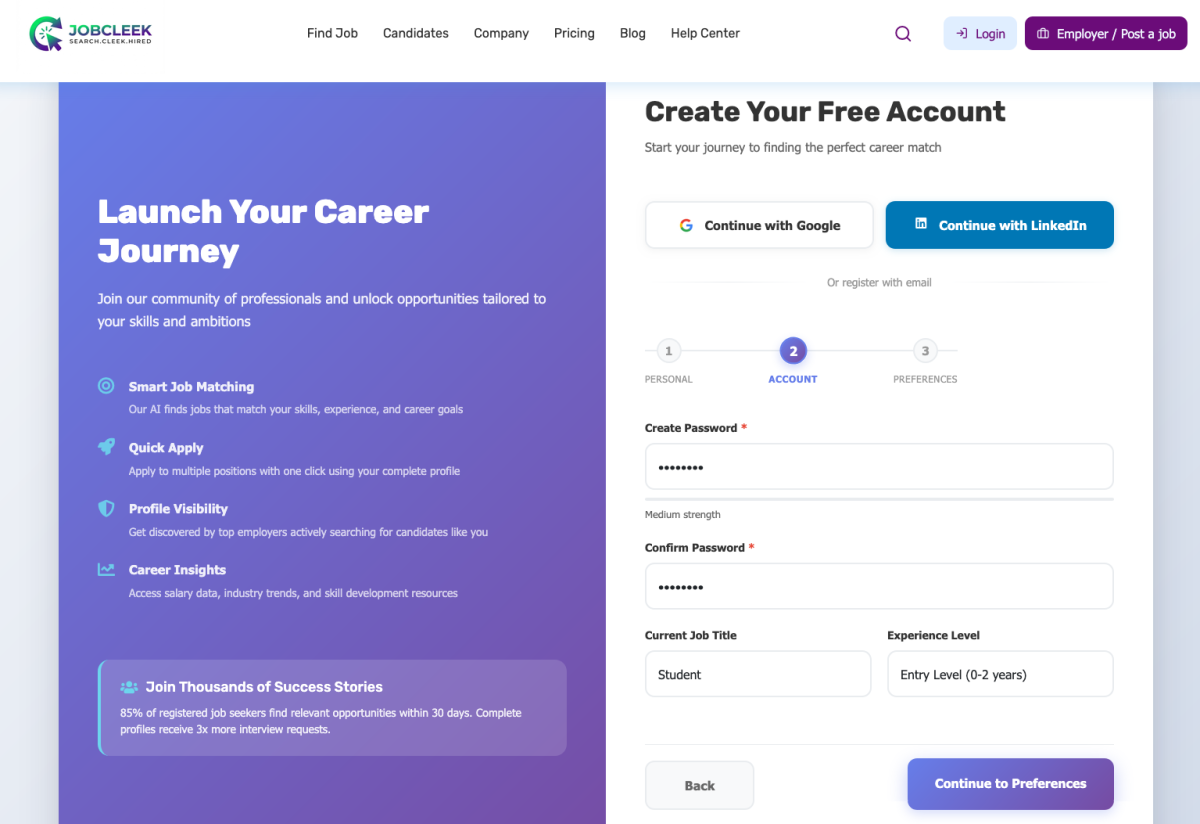
Left Panel (Purple Background)
- Same hero section and feature list as Step 1
- Maintains visual consistency throughout registration flow
Right Panel (White Background)
- Page Header: "Create Your Free Account" with subtitle
- Social Login Options: Still available at this stage
- Step Indicator: Shows Step 2 (Account) as active
- Account Setup Form: Four input fields
- Create Password (password field with dots)
- Password strength indicator
- Confirm Password (password field with dots)
- Current Job Title (dropdown)
- Experience Level (dropdown)
- Navigation Buttons: "Back" and "Continue to Preferences"
Step-by-Step User Guide
To Complete Account Setup:
- Create a strong password in the "Create Password" field
- Password will be hidden (shown as dots)
- Check the strength indicator below the field
- Re-enter your password in the "Confirm Password" field to verify
- Select your current job title from the "Current Job Title" dropdown
- Example: "Student" (as shown in screenshot)
- Select your experience level from the "Experience Level" dropdown
- Example: "Entry Level (0-2 years)" (as shown in screenshot)
- Click "Continue to Preferences" to proceed to the final step
- Need to edit previous information? Click "Back" to return to Step 1
Fields, Buttons & Controls Explanation
|
Element |
Type |
Purpose |
Required |
Notes |
|---|---|---|---|---|
|
Continue with Google |
Button |
Alternative quick registration |
Optional |
Still available at this stage |
|
Continue with LinkedIn |
Button |
Alternative quick registration |
Optional |
Still available at this stage |
|
Create Password |
Password Input |
Set account password |
Required |
Marked with asterisk (*); hidden input |
|
Password Strength Indicator |
Visual Feedback |
Shows password security level |
N/A |
Appears below password field |
|
Confirm Password |
Password Input |
Verify password accuracy |
Required |
Marked with asterisk (*); must match first password |
|
Current Job Title |
Dropdown |
User's current or desired role |
Required |
Pre-populated options (e.g., Student, Developer, Manager) |
|
Experience Level |
Dropdown |
Years of professional experience |
Required |
Options include Entry Level (0-2 years), Mid-level, Senior, etc. |
|
Back |
Secondary Button |
Returns to Step 1 |
N/A |
Saves current progress |
|
Continue to Preferences |
Primary Button |
Advances to Step 3 |
N/A |
Only active when all required fields are valid |
Tips & Best Practices
✅ Create a strong password with at least 8 characters, including uppercase, lowercase, numbers, and symbols
✅ Use a unique password not used on other platforms for better security
✅ Choose the job title that best matches your career goals, not just your current position
✅ Be honest about your experience level to receive appropriate job matches
✅ Use a password manager to securely store your credentials
Common Mistakes
❌ Passwords don't match – Carefully re-type your password in the confirmation field
❌ Weak password – Avoid common words, sequential numbers, or personal information
❌ Selecting wrong experience level – This affects job recommendations; choose accurately
❌ Clicking "Continue" before all fields are complete – Button will remain inactive
Troubleshooting
|
Issue |
Solution |
|---|---|
|
Password strength shows "weak" |
Add more characters, mix uppercase/lowercase, include numbers and symbols |
|
"Passwords do not match" error |
Retype both password fields carefully; check for typos |
|
Can't find my job title |
Select the closest match or choose a general category |
|
"Continue to Preferences" button disabled |
Ensure all required fields are filled and passwords match |
|
Lost progress from Step 1 |
Click "Back" to verify; data should be saved |
Related Pages / Next Steps
Previous: Account Registration - Personal Information (Step 1 of 3)
Next: Account Registration - Preferences (Step 3 of 3)
- Set preferred job types
- Choose industry and salary expectations
- Complete registration
Related:
- Password Reset (if needed after account creation)
- Profile Settings → Security
- Help Center → Account Security Best Practices
Page 3: Account Registration - Preferences
Overview
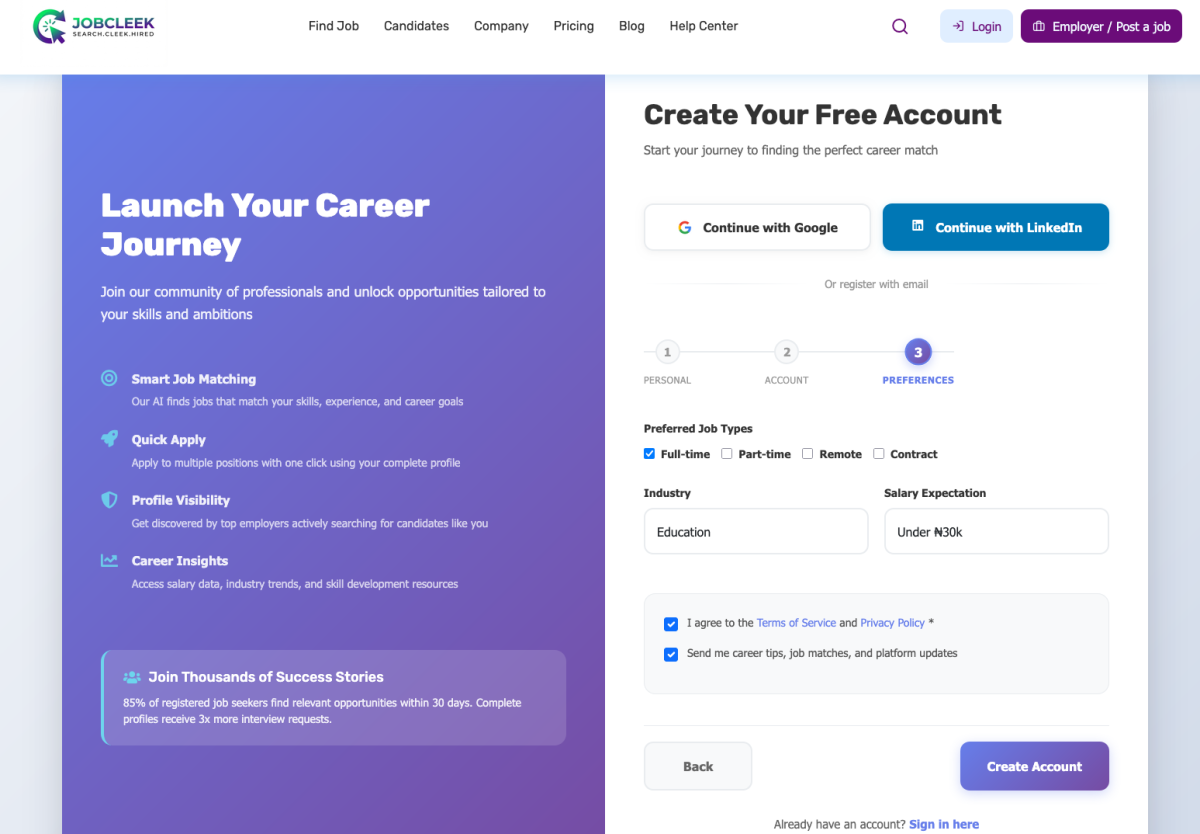
This is the final step (Step 3 of 3) of the account creation process where users define their job search preferences. This page collects information about preferred job types, industry, salary expectations, and requires agreement to terms and conditions before completing registration.
Target Users: New users completing the final stage of registration
Purpose: To personalize the job search experience by capturing user preferences and finalizing account creation with terms acceptance
When to Use: Automatically accessed after completing Step 2 (Account Setup)
Navigation Path
Homepage → Register → Personal Information (Step 1) → Account Setup (Step 2) → Preferences (Step 3 of 3)
Page Layout Breakdown
Left Panel (Purple Background)
- Consistent hero section and feature list
- Maintains brand continuity throughout the registration flow
Right Panel (White Background)
- Page Header: "Create Your Free Account" with subtitle
- Social Login Options: Still available as alternative
- Step Indicator: Shows Step 3 (Preferences) as active
- Preferences Form: Multiple input sections
- Preferred Job Types (multi-select buttons)
- Industry (dropdown)
- Salary Expectation (dropdown)
- Terms and Conditions (checkboxes)
- Navigation Buttons: "Back" and "Create Account"
- Login Link: For existing users
Step-by-Step User Guide
To Complete Your Registration:
- Select your preferred job types by clicking one or more options:
- Full-time
- Remote
- Contract
- (Multiple selections allowed)
- Select your industry from the dropdown menu
- Example: "Education" (as shown in screenshot)
- Select your salary expectation from the dropdown menu
- Example: "Under ₦30k" (as shown in screenshot)
- Read and accept the Terms of Service and Privacy Policy
- Check the first checkbox: "I agree to the Terms of Service and Privacy Policy"
- This is required (marked with red asterisk)
- Opt in to communications (optional)
- Check the second checkbox: "Send me career tips, job vacancies, and platform updates"
- This is optional but recommended for job alerts
- Click "Create Account" to complete registration
- Need to edit previous information? Click "Back" to return to Step 2
- Already have an account? Click "Sign in here" at the bottom
Fields, Buttons & Controls Explanation
|
Element |
Type |
Purpose |
Required |
Notes |
|---|---|---|---|---|
|
Continue with Google |
Button |
Alternative quick registration |
Optional |
Still available at final step |
|
Continue with LinkedIn |
Button |
Alternative quick registration |
Optional |
Still available at final step |
|
Preferred Job Types |
Multi-select Buttons |
Select one or more job types |
Required |
Options: Full-time, Remote, Contract (shown); may include Part-time, Freelance |
|
Industry |
Dropdown |
User's target industry sector |
Required |
Pre-populated options (e.g., Education, Technology, Healthcare, Finance) |
|
Salary Expectation |
Dropdown |
Expected salary range |
Required |
Options include various salary brackets (e.g., Under ₦30k, ₦30k-₦50k, etc.) |
|
Terms Agreement Checkbox |
Checkbox |
Legal agreement to platform terms |
Required |
Marked with asterisk (*); must be checked to proceed |
|
Marketing Opt-in Checkbox |
Checkbox |
Consent for job alerts and updates |
Optional |
Recommended for receiving job notifications |
|
Back |
Secondary Button |
Returns to Step 2 |
N/A |
Saves current progress |
|
Create Account |
Primary Button |
Finalizes registration |
N/A |
Only active when required fields are complete |
|
Sign in here |
Text Link |
Redirects to login page |
N/A |
For existing users |
Tips & Best Practices
✅ Select multiple job types to increase your job match opportunities
✅ Choose your primary industry but know you can update this later in profile settings
✅ Be realistic with salary expectations based on your experience level from Step 2
✅ Read the Terms of Service and Privacy Policy before agreeing (click the links)
✅ Opt in to communications to receive timely job alerts and career tips
✅ Review all three steps using the "Back" button before final submission if needed
Common Mistakes
❌ Not selecting any job type – At least one preference must be selected
❌ Forgetting to check the Terms agreement – Registration cannot complete without this
❌ Choosing unrealistic salary expectations – May limit relevant job matches
❌ Skipping the marketing opt-in – You may miss important job opportunities
❌ Not reviewing previous steps – Errors in Steps 1-2 can't be fixed after account creation
Troubleshooting
|
Issue |
Solution |
|---|---|
|
"Create Account" button is disabled |
Ensure all required fields are filled and Terms checkbox is checked |
|
Can't select multiple job types |
Click each button individually; selected buttons should highlight |
|
Terms of Service link not working |
Try right-click → "Open in new tab" or contact support |
|
Salary options don't match my expectations |
Choose the closest range; you can update this later in profile settings |
|
Registration fails after clicking "Create Account" |
Check internet connection; verify email isn't already registered; try again |
|
Want to change information from previous steps |
Click "Back" button to navigate to earlier steps |
Related Pages / Next Steps
Previous: Account Registration - Account Setup (Step 2 of 3)
After Registration:
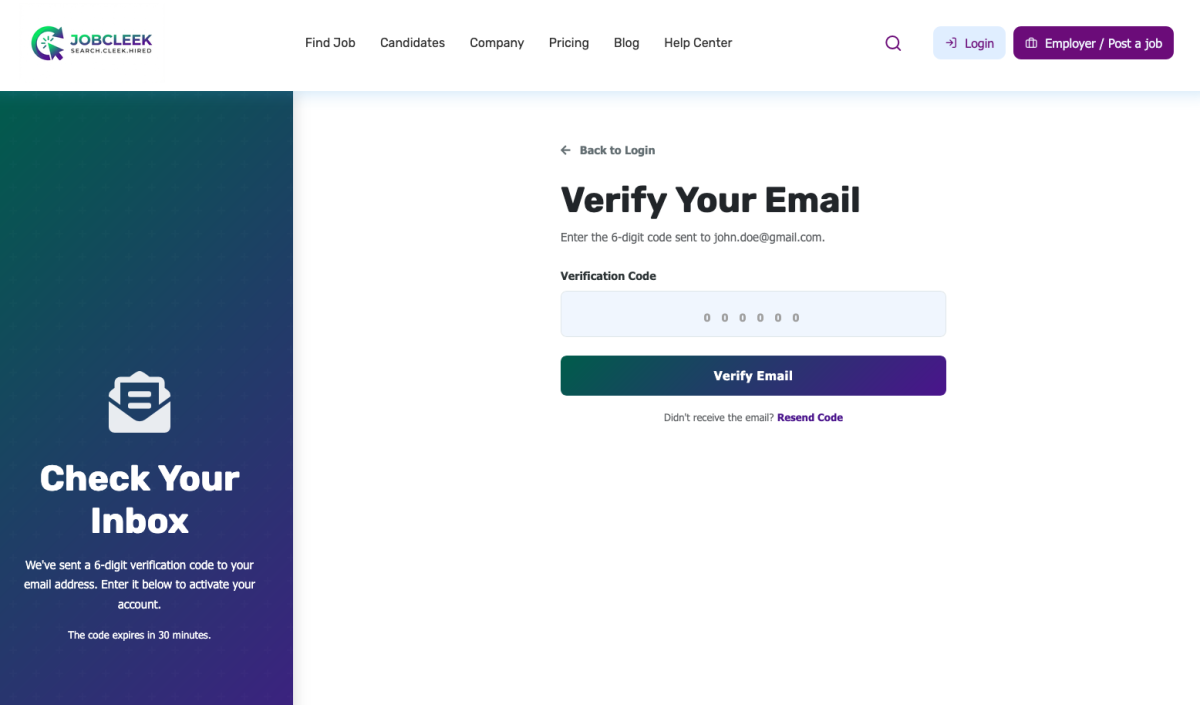
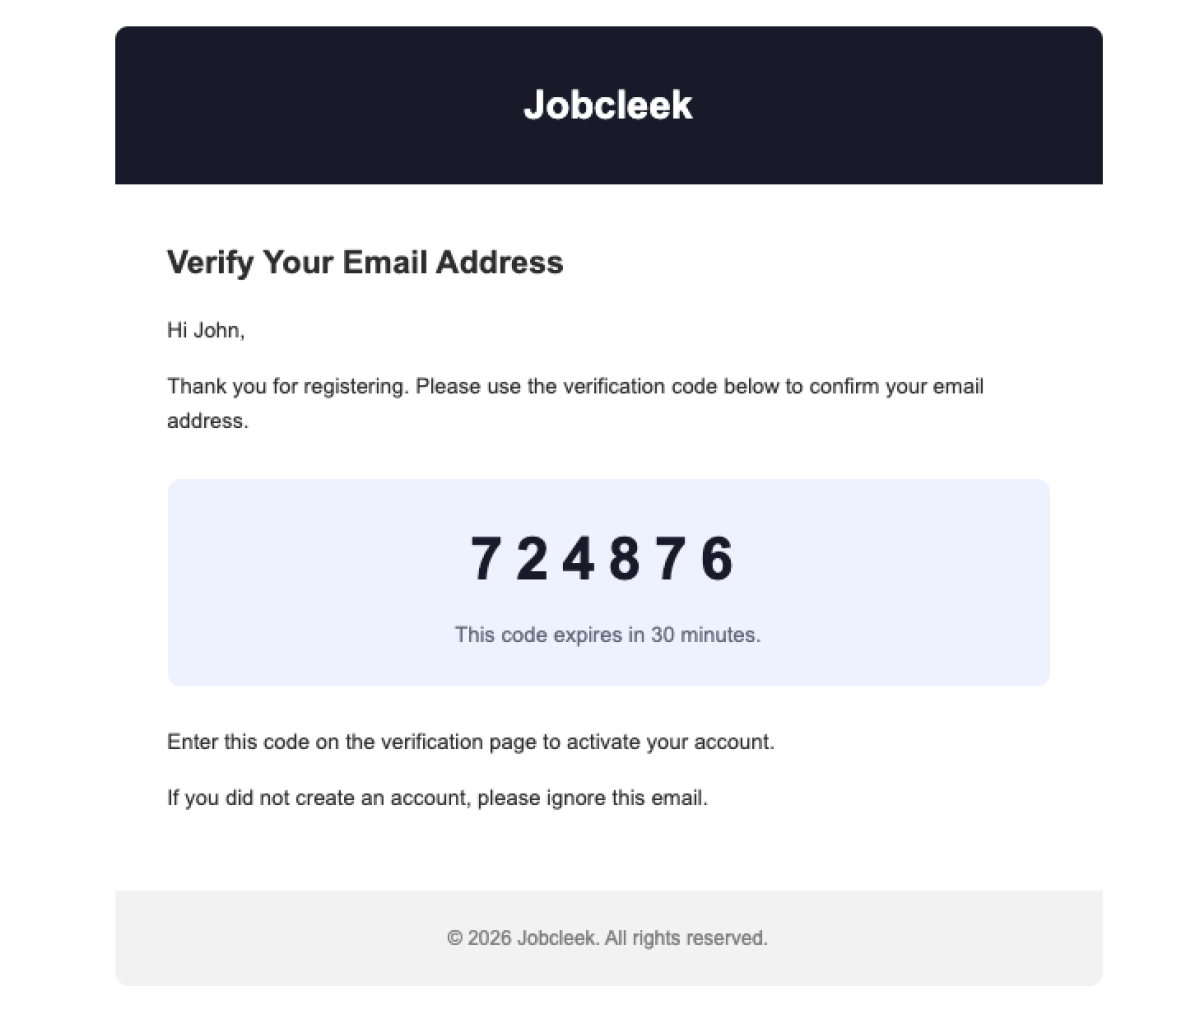
- Email Verification Page (check your inbox)
- Welcome/Onboarding Tour
- Complete Your Profile
- Browse Jobs Dashboard
Related:
- Terms of Service (legal document)
- Privacy Policy (legal document)
- Profile Settings → Job Preferences (to update later)
- Help Center → Getting Started Guide
Important Notes
⚠️ Email Verification Required: After clicking "Create Account," you will receive a verification email. You must verify your email address to activate your account and access all features.
⚠️ Terms Agreement is Binding: By checking the Terms of Service box, you are entering into a legal agreement with JobCleek.
⚠️ Data Privacy: Your preferences are used to personalize job recommendations. Review the Privacy Policy to understand how your data is used.
⚠️ Profile Completion: While registration is complete after this step, completing your full profile (adding resume, skills, experience) significantly improves job matching accuracy.
Complete Registration Flow Summary
|
Step |
Page |
Key Information Collected |
|---|---|---|
|
1 |
Personal Information |
First Name, Last Name, Email, Phone, Location |
|
2 |
Account Setup |
Password, Job Title, Experience Level |
|
3 |
Preferences |
Job Types, Industry, Salary, Terms Agreement |
Total Time: Approximately 2-3 minutes to complete all steps
Next Action: Check email for verification link and complete profile setup
This documentation is ready for direct use in your knowledge base, help center, or training materials. Each page follows a consistent structure and provides comprehensive guidance for new users creating accounts on the JobCleek platform.